Manual
Notes
Chobiit cannot be used in guest spaces or with apps within guest spaces.
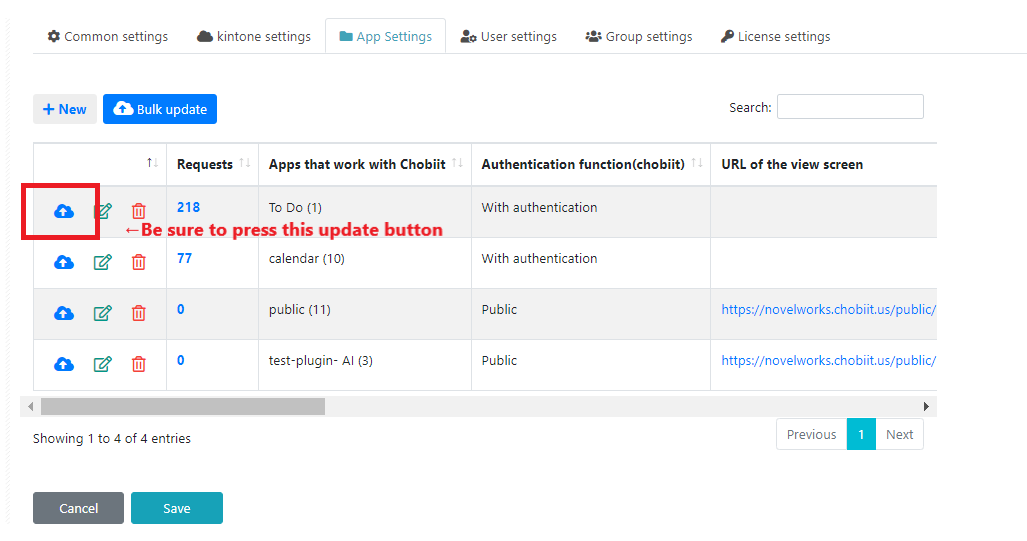
Make sure to click the update button if changes have been made to the shared app.
(If the update button is not clicked, changes will not be applied to Chobiit.)
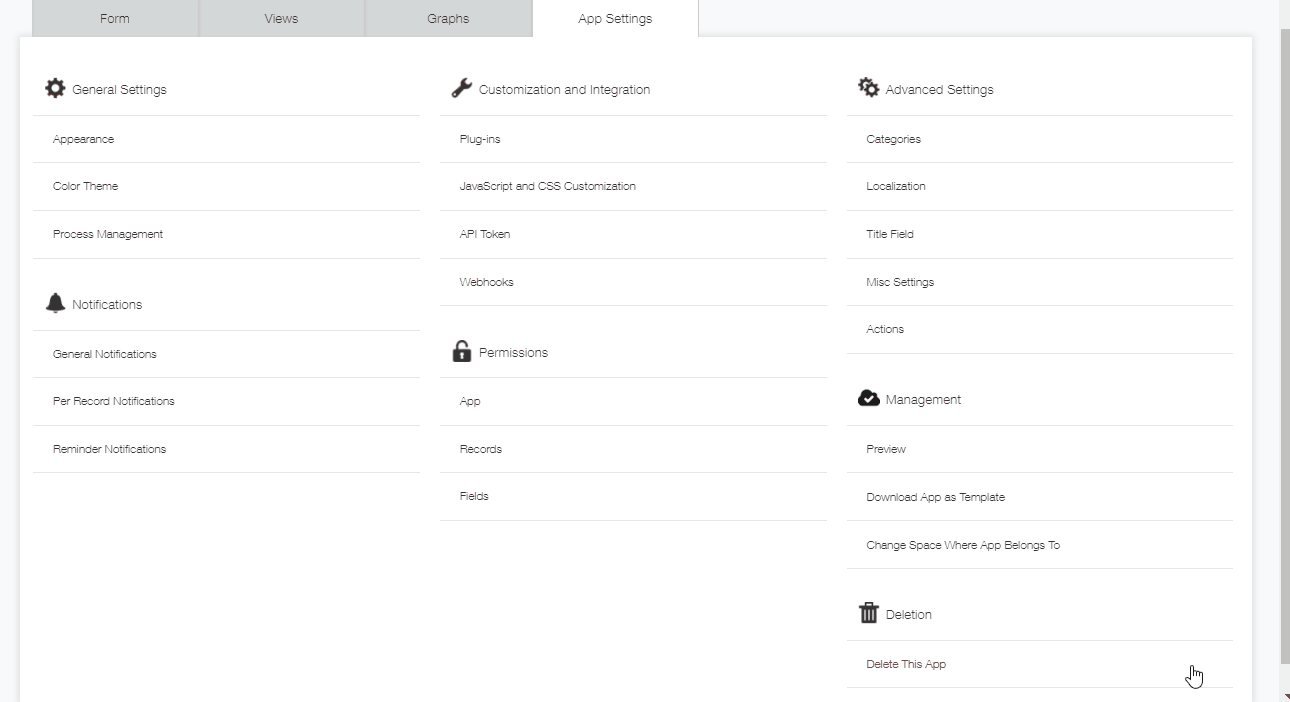
- Common setting
- Using the login authentication feature to share apps
- Using a Kintone app as a web form
- Show only records in your own / group
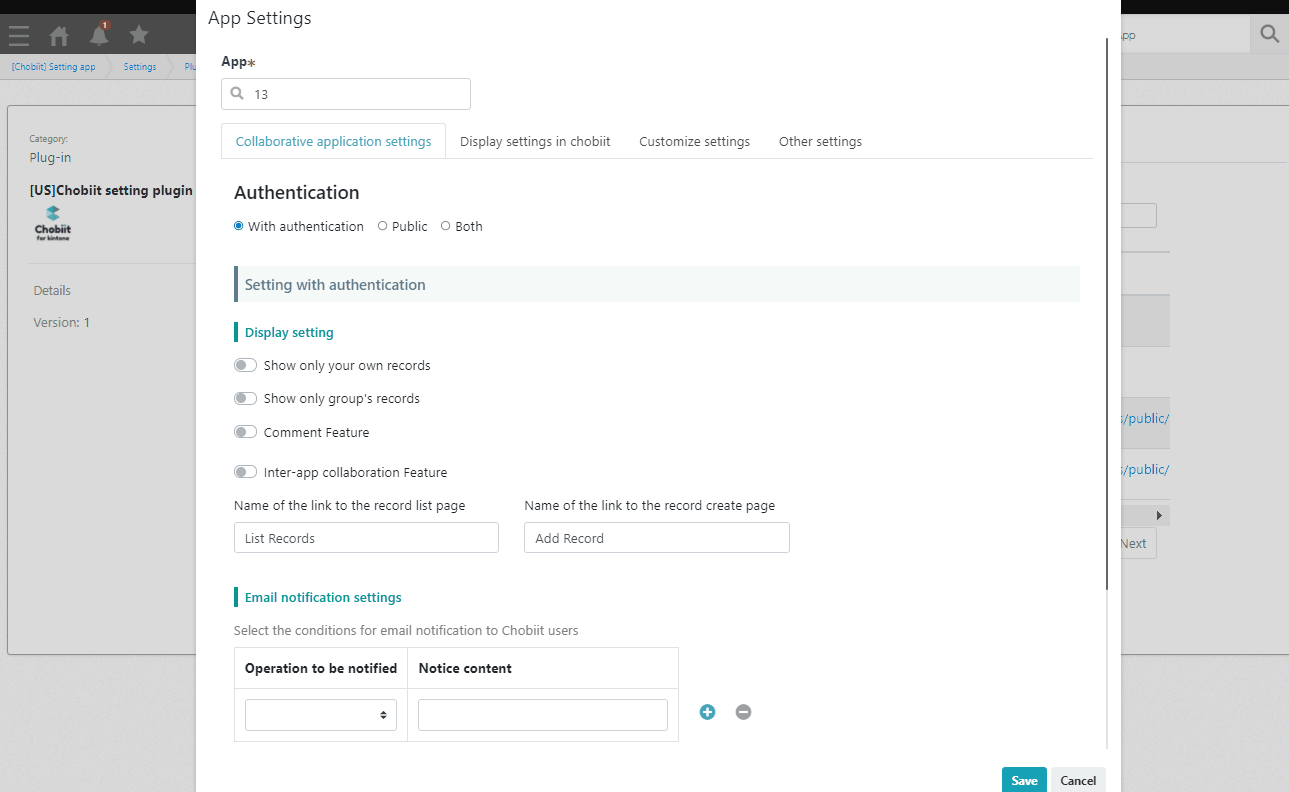
- Email notification settings
- Chobiit display settings
- Customization settings
- Other settings
- Enable auto-send of confirmation email
- Simple temporary storage feature
- Group Settings
- Allow user self-registration
- Checking consumed requests
- Importing and Exporting Users
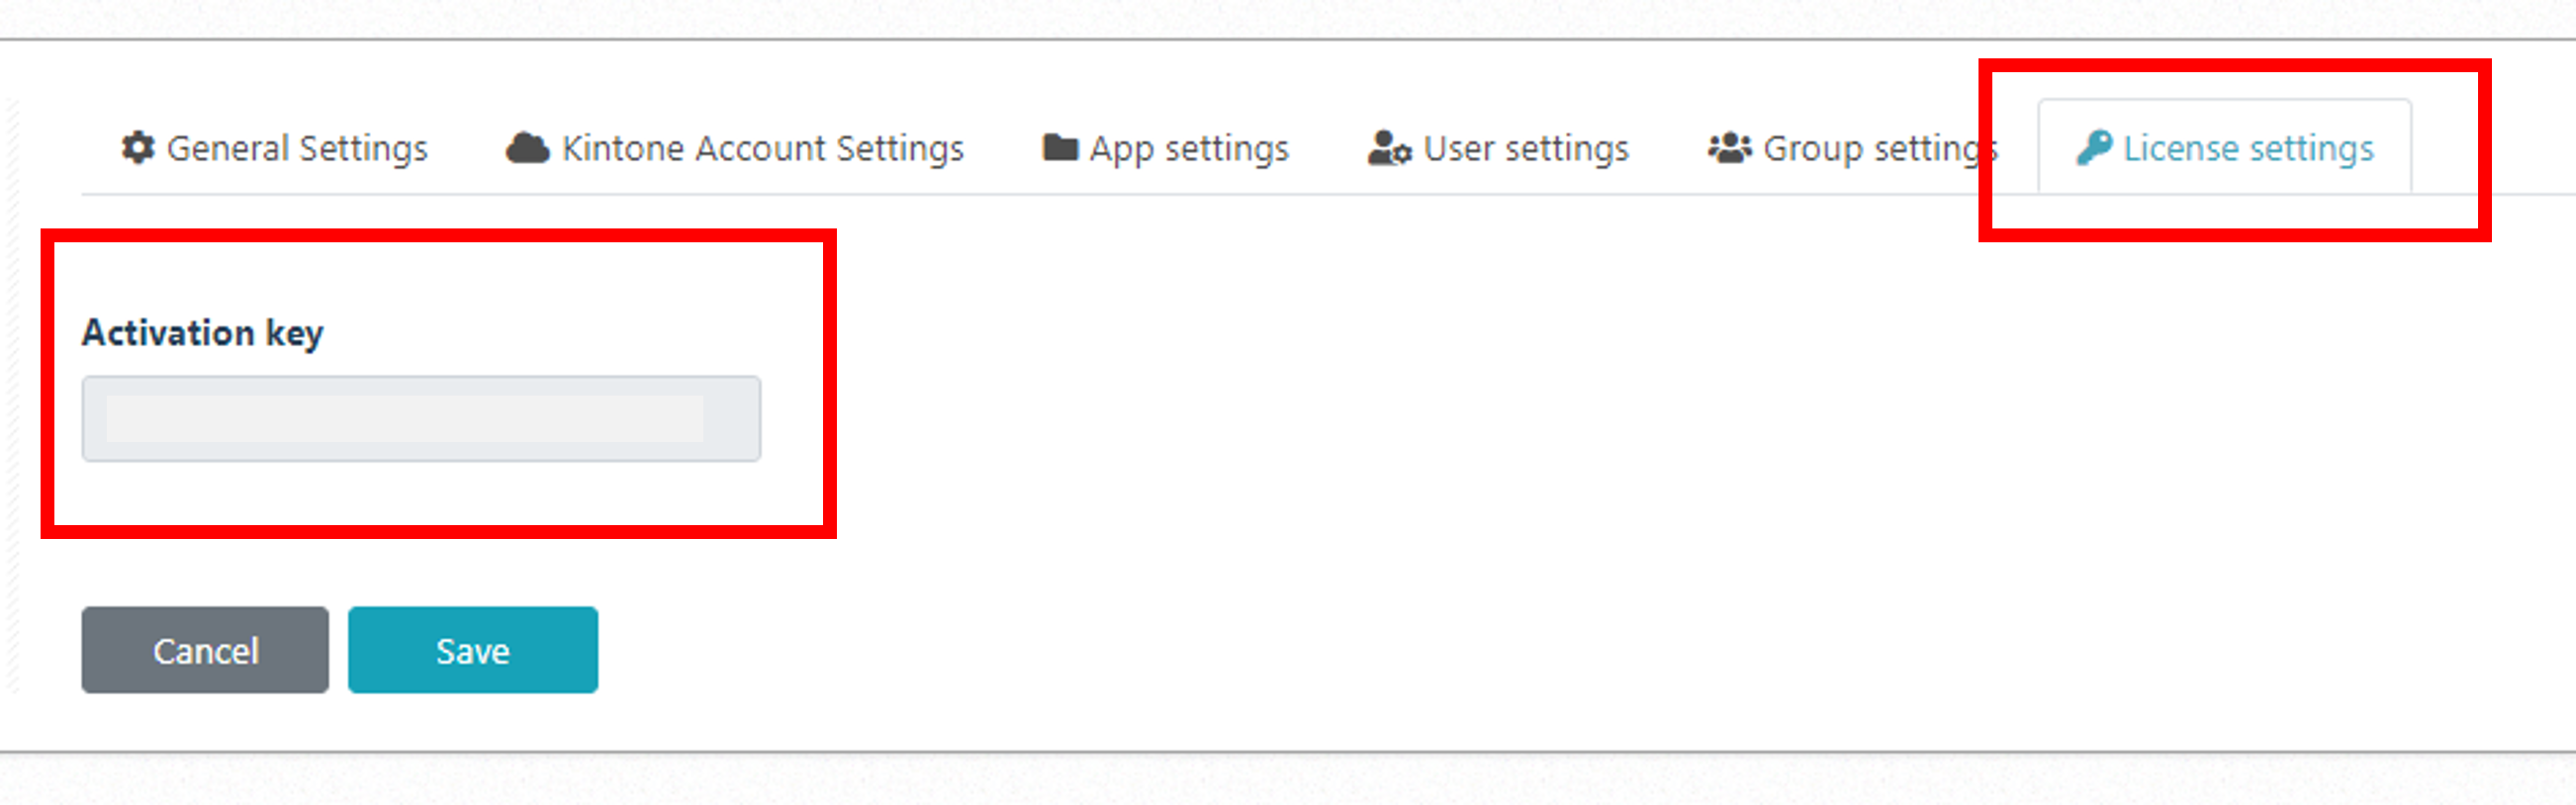
- Activation key
Start the trial
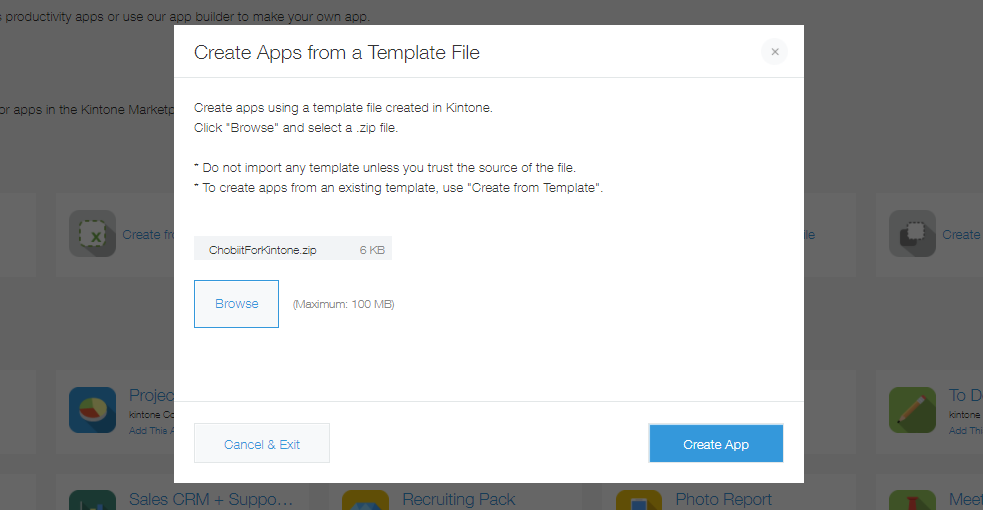
(1) Plug-in file and app template settings
Download the plug-in file. Unzip the file and check for the following two zip files in the folder.
・ ChobiitPlugin.zip (plug-in file)
・ ChobiitForKintone.zip (template app file)
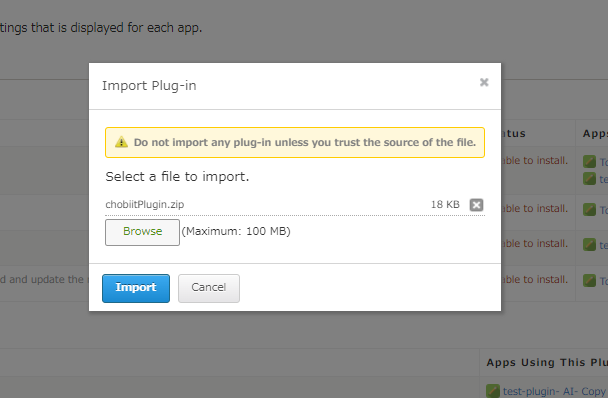
Import the plug-in file (chobiitPlugin.zip) to Kintone.
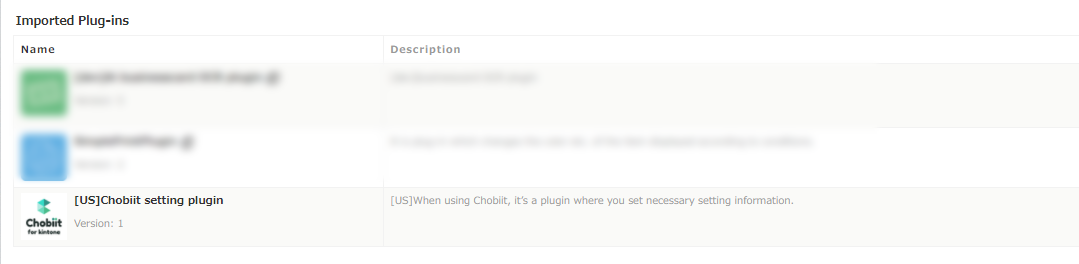
Check that the plug-in has been added.
Create an app using the app template file (ChobiitForKintone.zip).
* Note that use of Chobiit within guest spaces is unsupported.
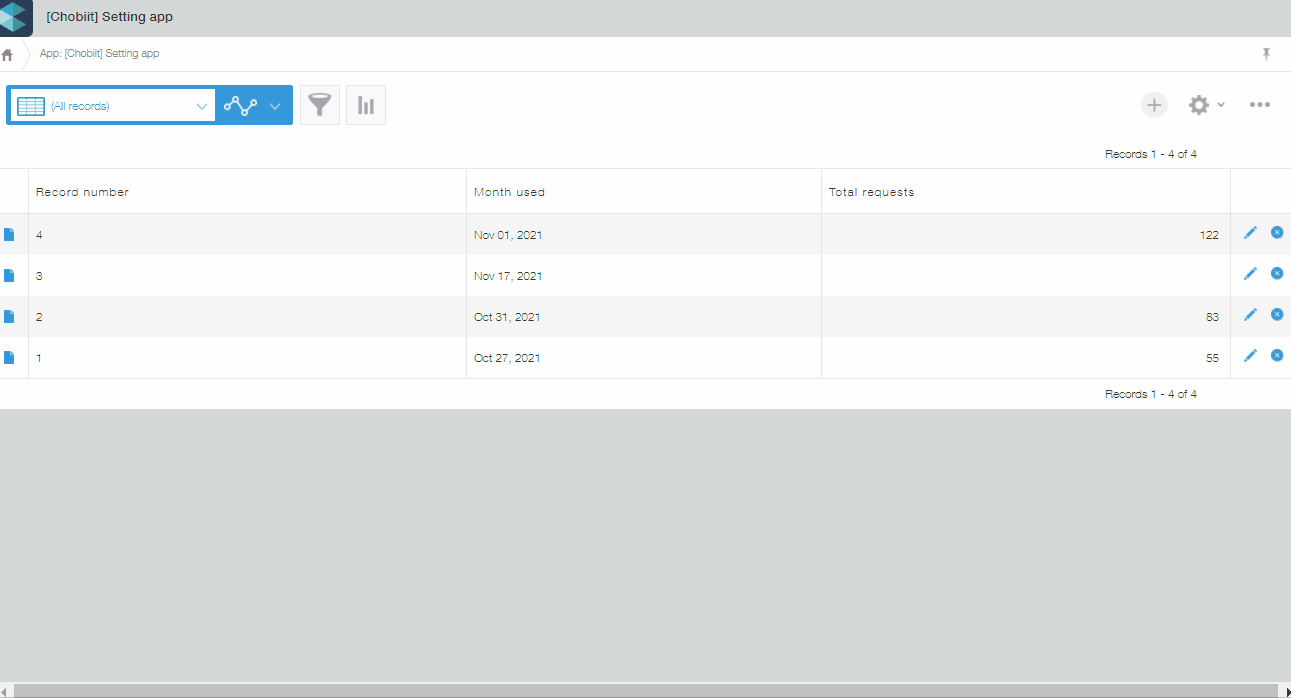
Check that the app has been created. All settings for the Chobiit plug-in will occur within the created [Chobiit] Setting app.
* Note that unlike with most Kintone plug-ins, the Chobiit plug-in does not need to be added into each app that you want to use it with.

(2) Start the trial
Open the Chobiit plug-in settings from the plug-in settings of the [Chobiit] Setting app.
The Chobiit plug-in should automatically be installed.
Enter in your email address and click “Trial start”. The activation key field can be left blank.

It will take 5 to 10 minutes for the Chobiit environment to be built.
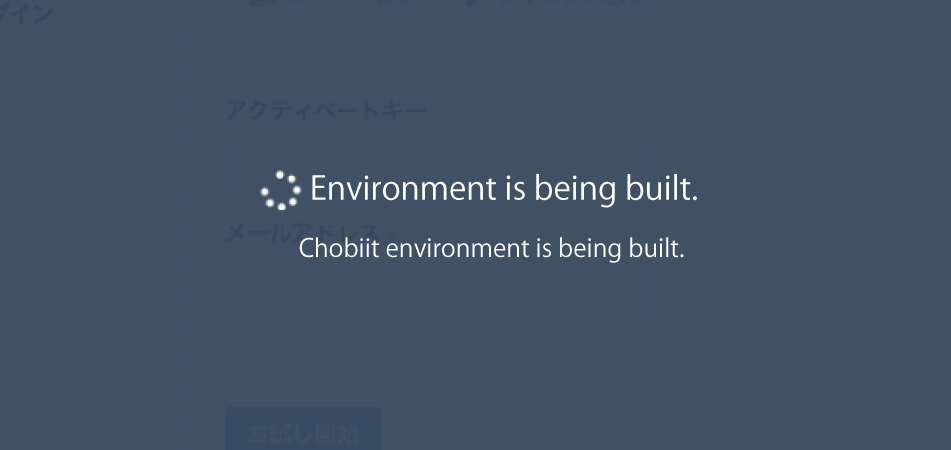
The environment can only be created once per subdomain. Trying again will cause an error to occur. After the environment is created, click the “OK” button to close the modal.
If you are prompted to enter your email address again after the environment has already been created, refresh your browser.
Note that clicking again to start the trial may result in the environment not being set up correctly.
The plug-in trial will begin.
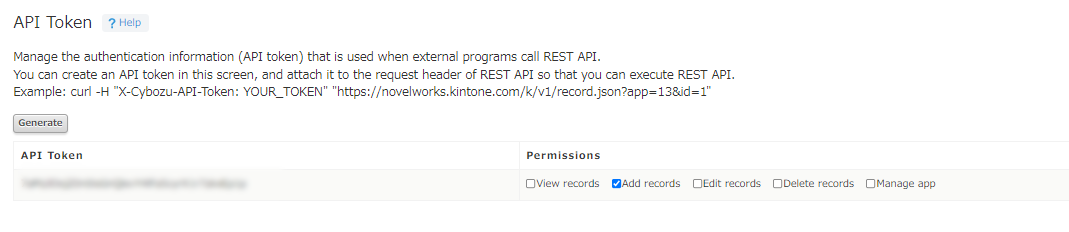
(3)Set the API token.
Generate an API token for the [Chobiit] Setting app. Copy the generated API token.
Give the API token the following permissions: View records, Add records, Edit records
Save the API token settings and update the app.
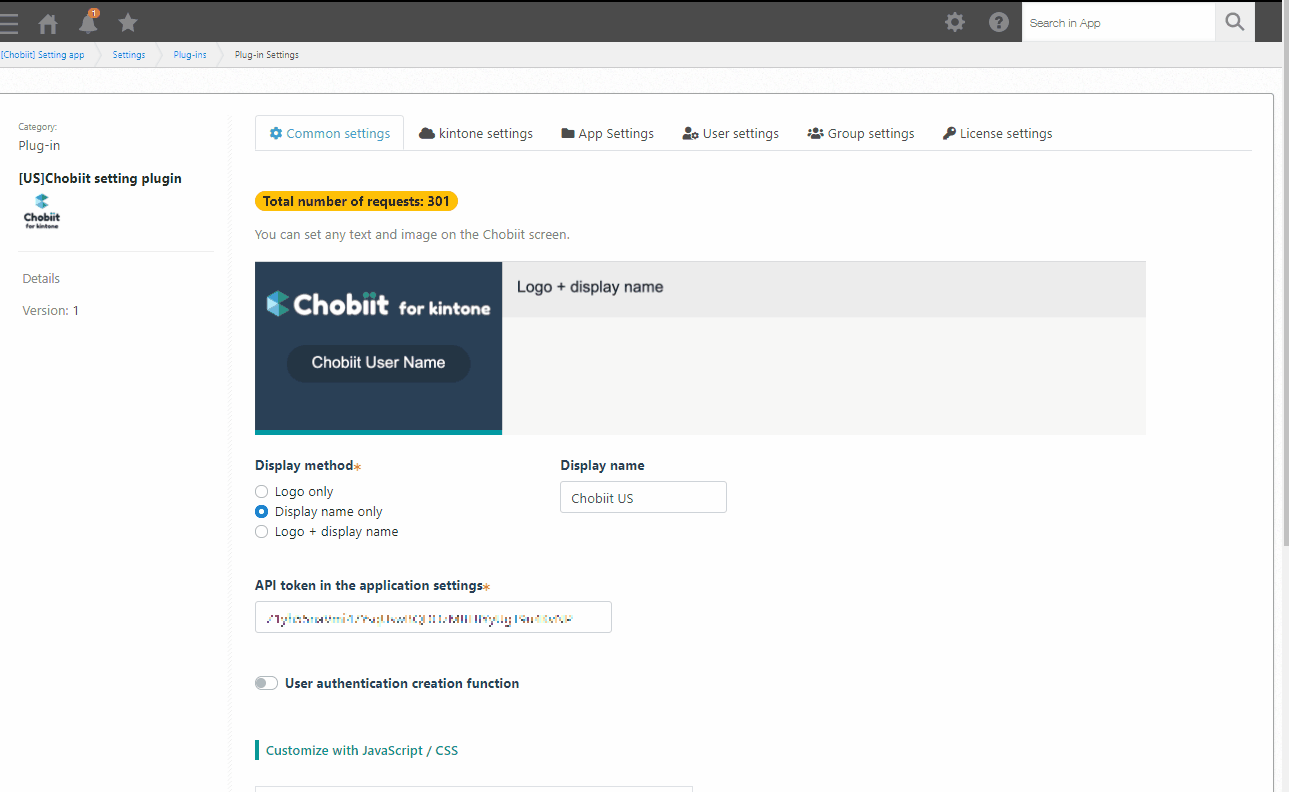
General Settings (within the Chobiit plug-in settings)
Open the Chobiit plug-in settings in the [Chobiit] Setting app.
Open the “General Settings” tab.
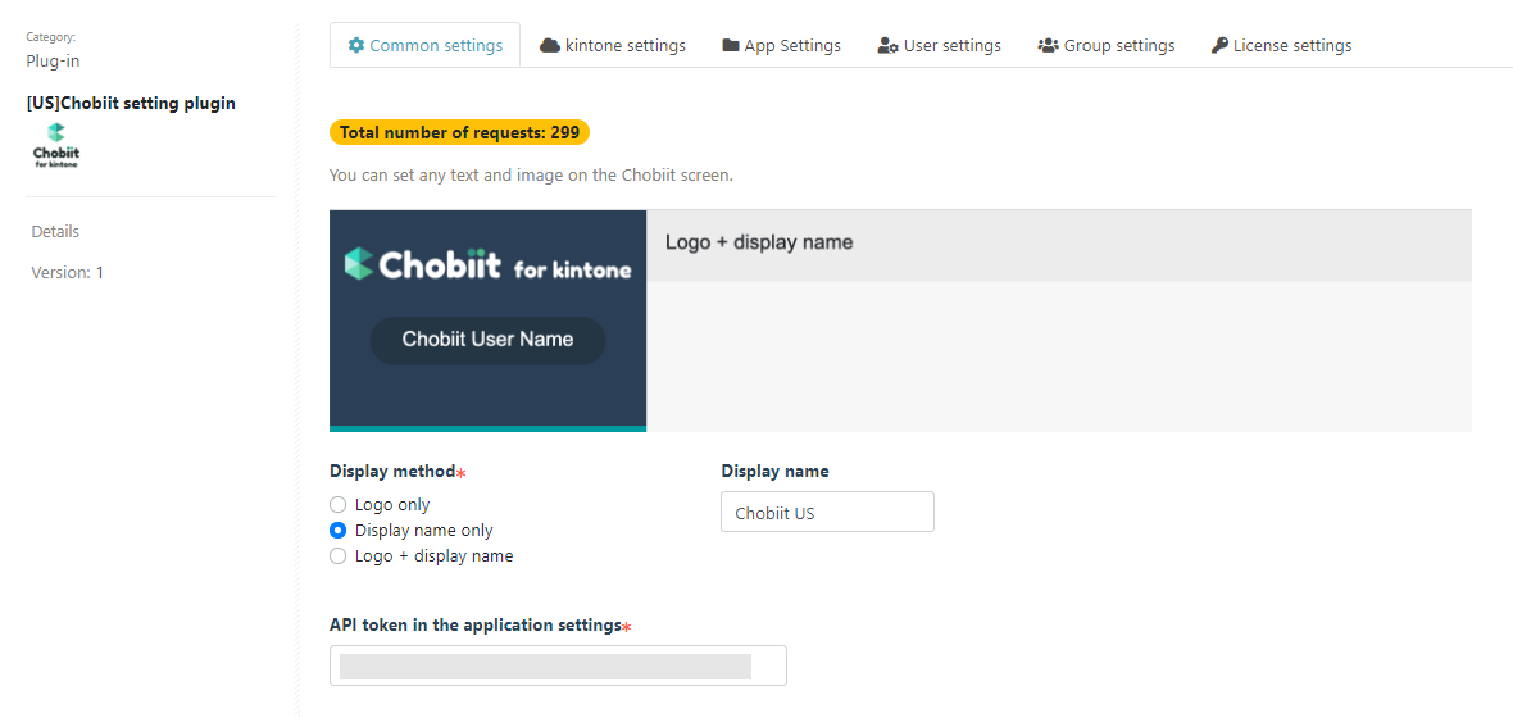
Display type
A combination of logo and display text to be shown on the Chobiit screen can be selected.
This setting is only used when login authentication is in place, but it is required regardless of whether login authentication is being used or not.
API token of this settings app
Enter in the API token created earlier.
Click “Save” at the bottom of the General Settings tab and update the app.
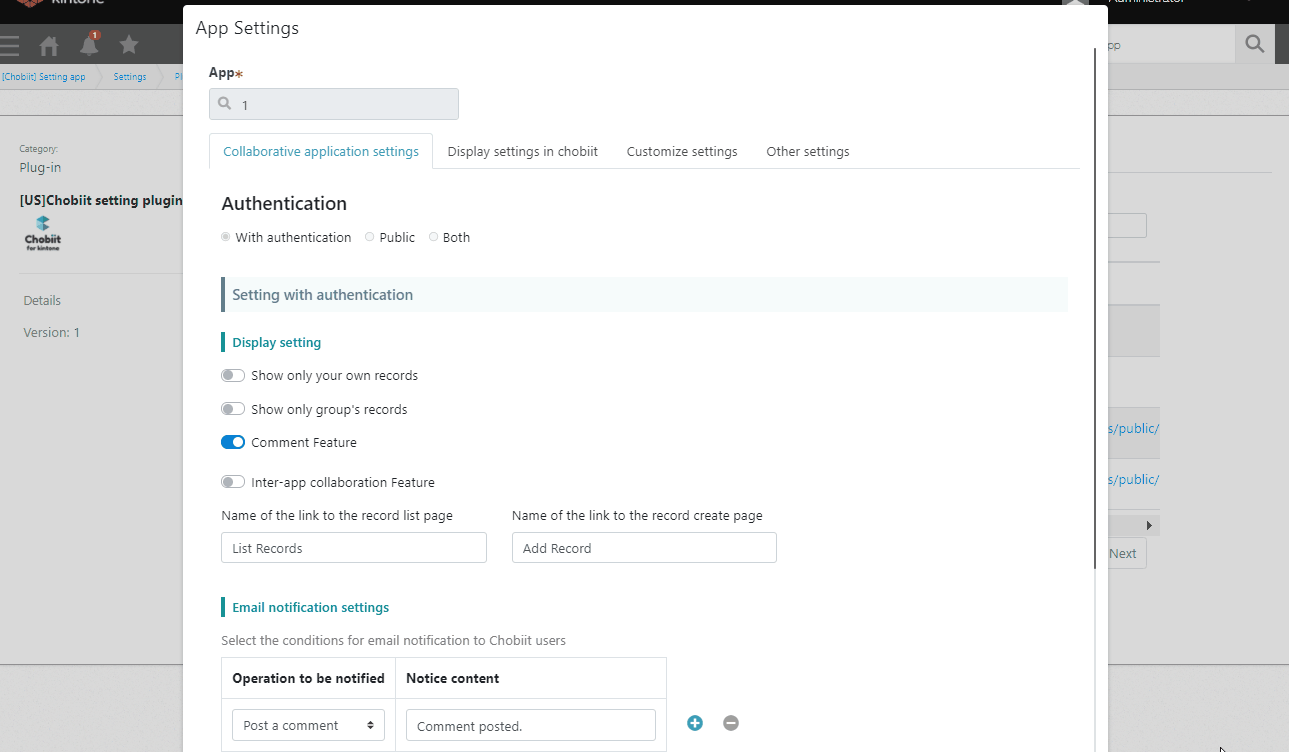
Using the login authentication feature to share apps
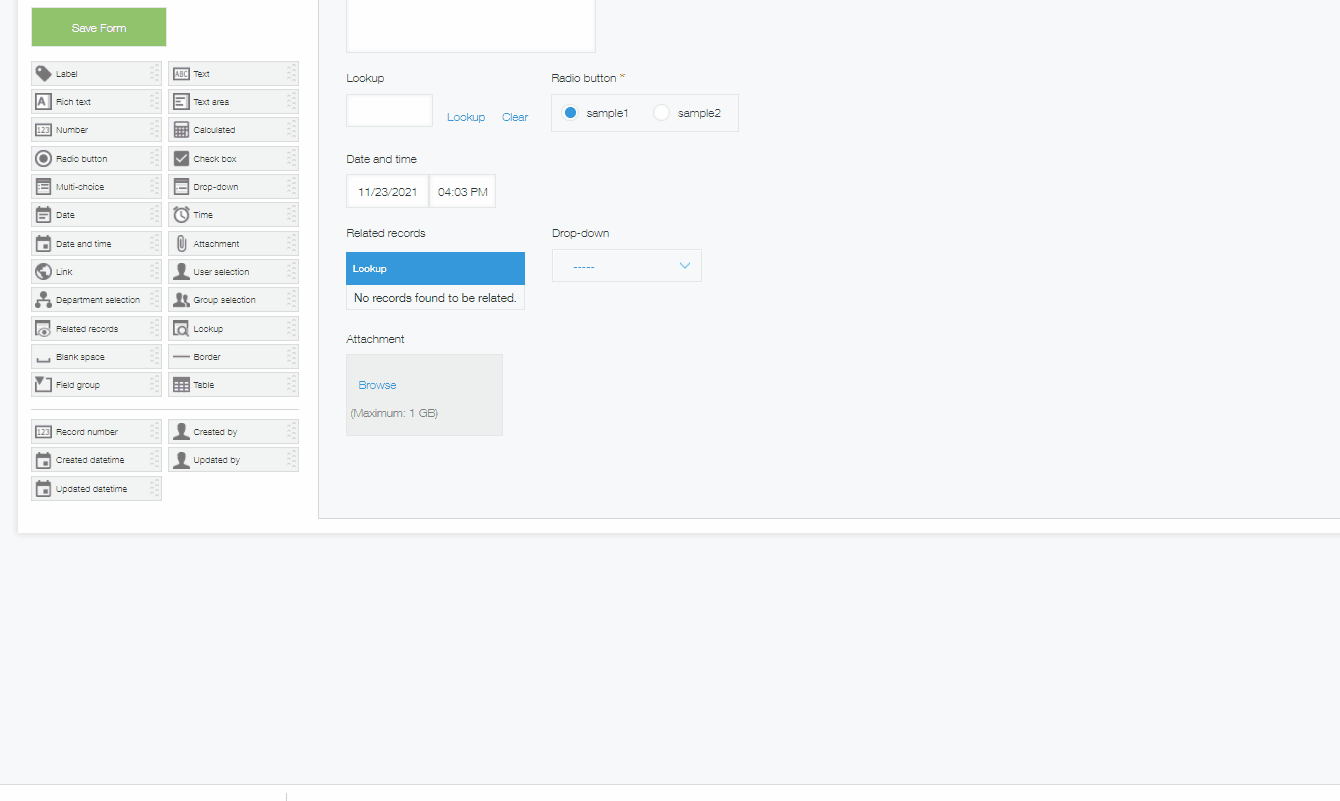
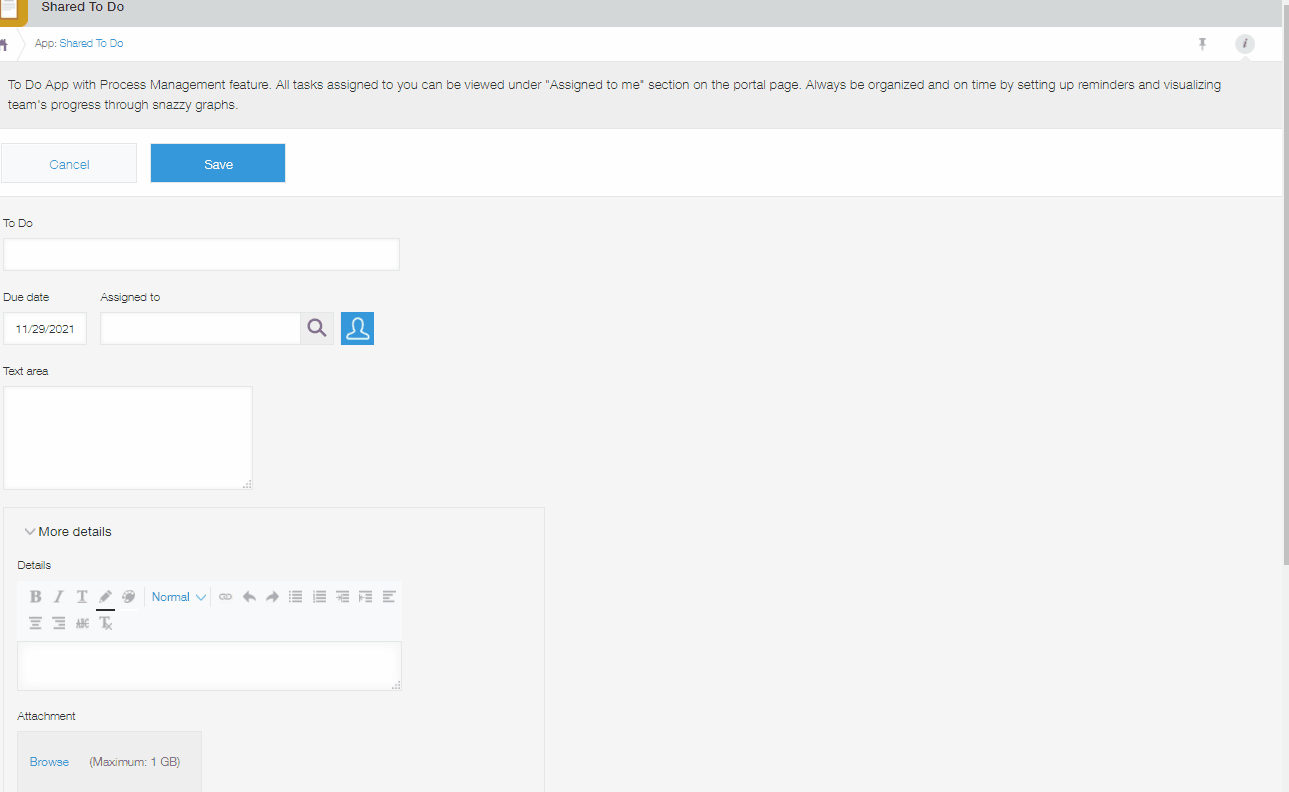
Add the following fields to the application that you want to share on Chobiit.
Date and time field (1): Record the date and time when a record is created from Chobiit
Text field (1): Record the record creator from Chobiit
Date and time field (2): Record the date and time when a record is updated from Chobiit
Text field (2): Record the record updater from Chobiit
Text area field: Added if the record will be shared with a group
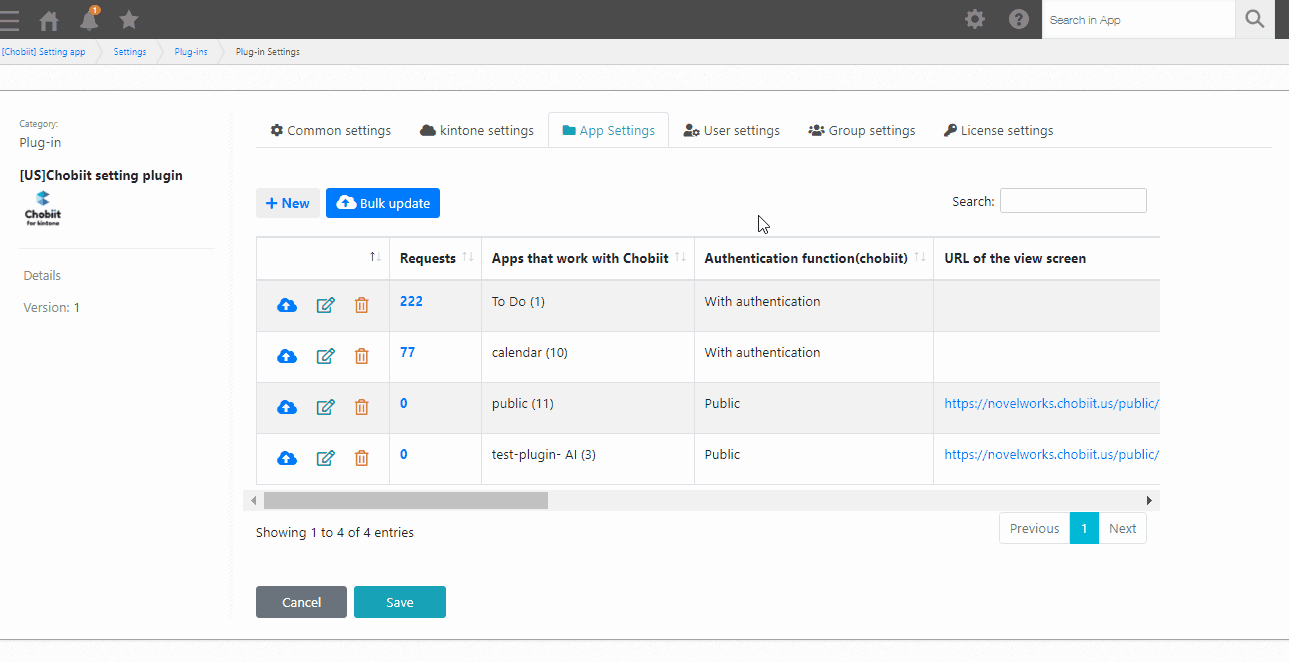
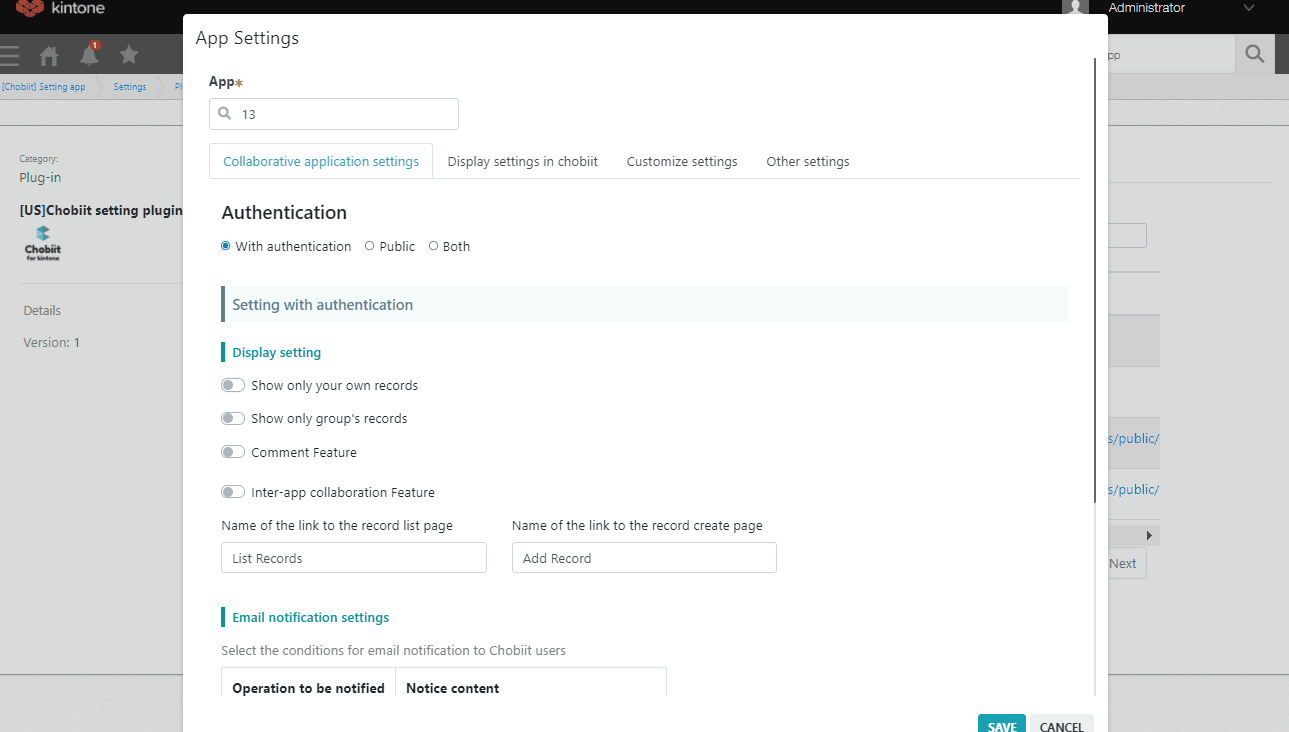
In the Chobiit plug-in settings, navigate to the “App Settings” tab. Click the “+ New” button. Search for the app to be shared in the search field.
Select “With authentication” as the “Authentication” type.
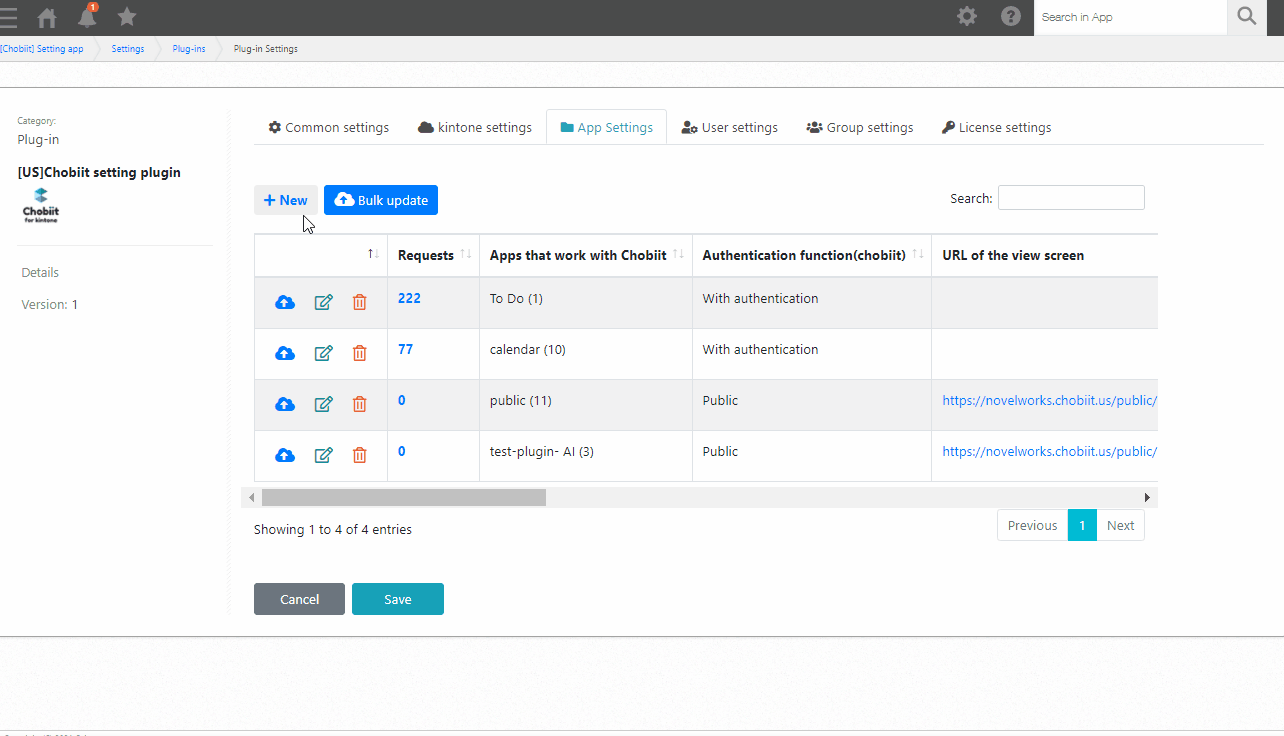
Scroll to the “Field settings” section at the bottom of the settings modal. Set the “Chobiit record creator”, “Created datetime”, “Chobiit record updater”, and “Updated datetime” drop-downs with the fields created earlier in the app to be shared. Click “Save” in the settings modal.
Check that the app to be shared has now been added to the table.
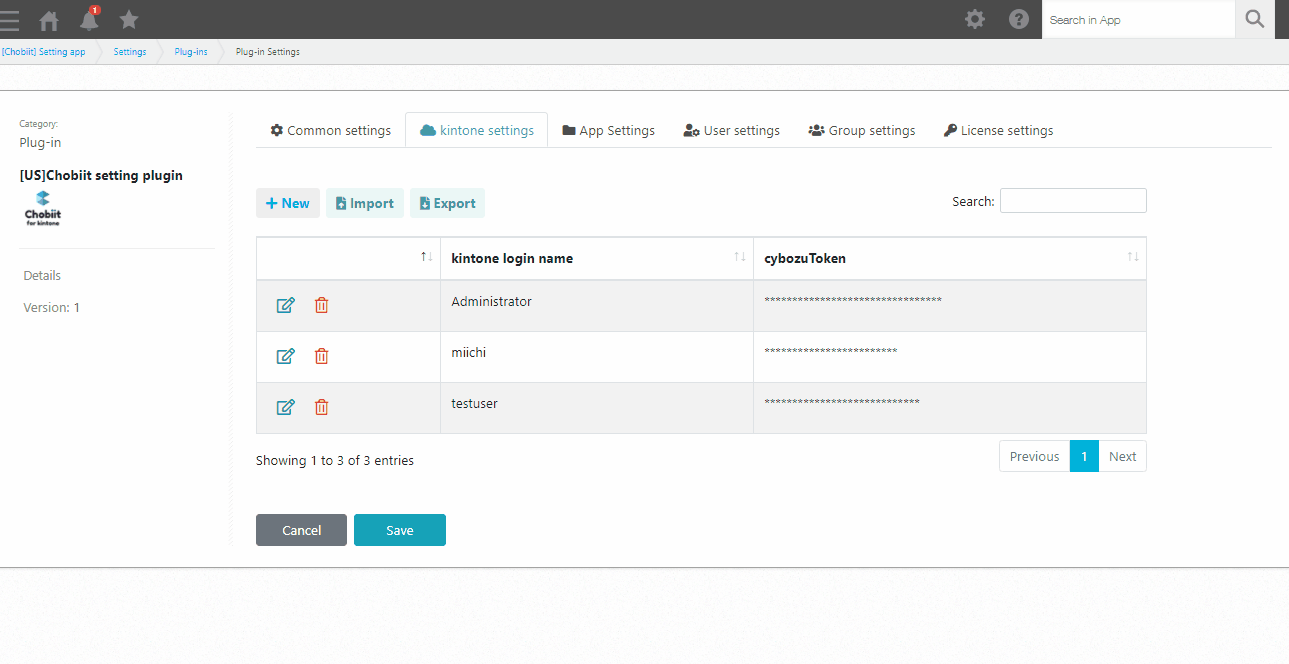
Set the Kintone account that will be used to generate Chobiit users
Navigate to the “Kintone Account Settings” tab in the Chobiit plug-in settings. Click the “+ New” button. Select the desired Kintone account from the drop-down list and enter in the password of the user. Click “Save” to add the account.
Remember that users generated by Chobiit inherit the access permissions associated with the linked Kintone account. To change the viewing and editing permissions of a Chobiit user, change the permissions of the associated Kintone account on the Kintone side.
Note that the linked Kintone account must not be using Two-factor authentication.
Also note that if the password of the linked Kintone account is changed, the password registered in the Chobiit plug-in settings must also be updated.
Generate Chobiit users
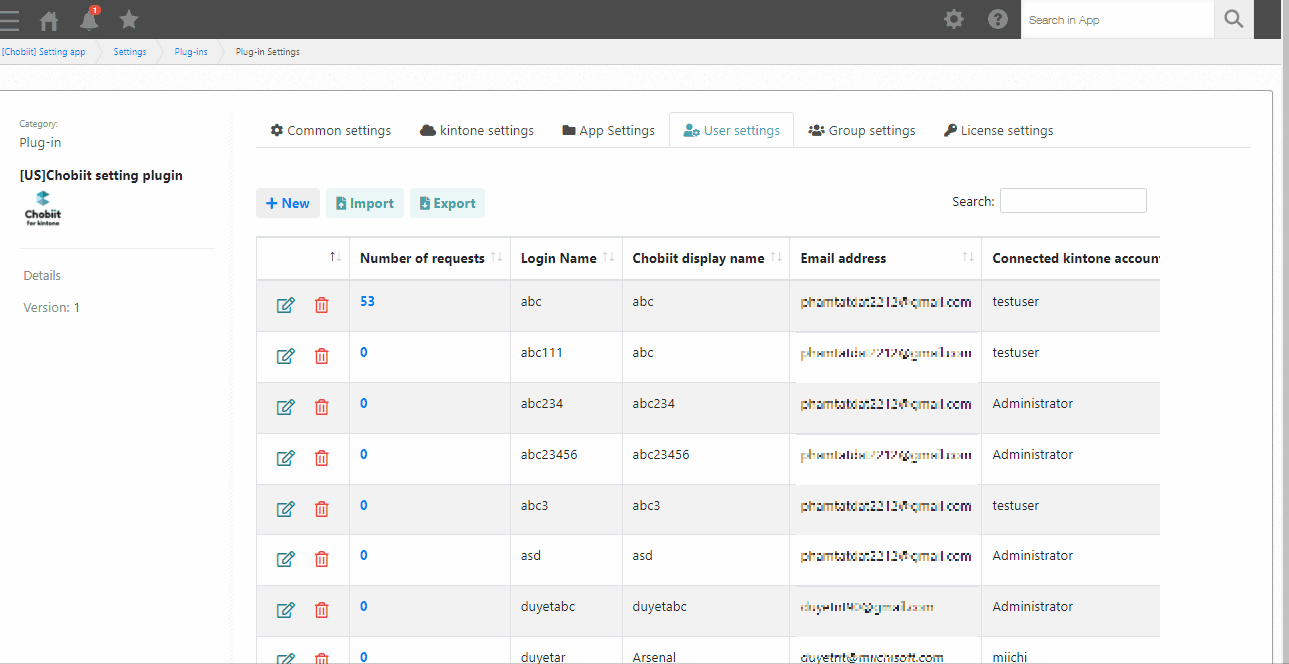
Navigate to the “User Settings” tab in the Chobiit plug-in settings. Click on the “+ New” button.
Fill in the “Chobiit Login Name”, “Chobiit display name”, and “Email address” of the account. Select the “Connected kintone account” from the drop-down list of Kintone accounts linked in the “Kintone Account Settings” tab. Finally, select all the apps to share with the user from the “App” table under the “Select the app you want to use with Chobiit” setting.
・Each Kintone license can generate 100 Chobiit accounts.
・The login name of a Chobiit account must be unique.
・The linked Kintone accounts in the “Kintone Account Settings” tab will be displayed in the drop-down list of the “Connected kintone account” setting. The registered apps in the “App Settings” tab will be displayed in the drop-down list of the “App” table setting.
Click “Save” and enter in an initial password for the account.
Confirm the email contents. After set up is complete, the initial Chobiit login information will be sent to the email address entered into the “Email address” setting.
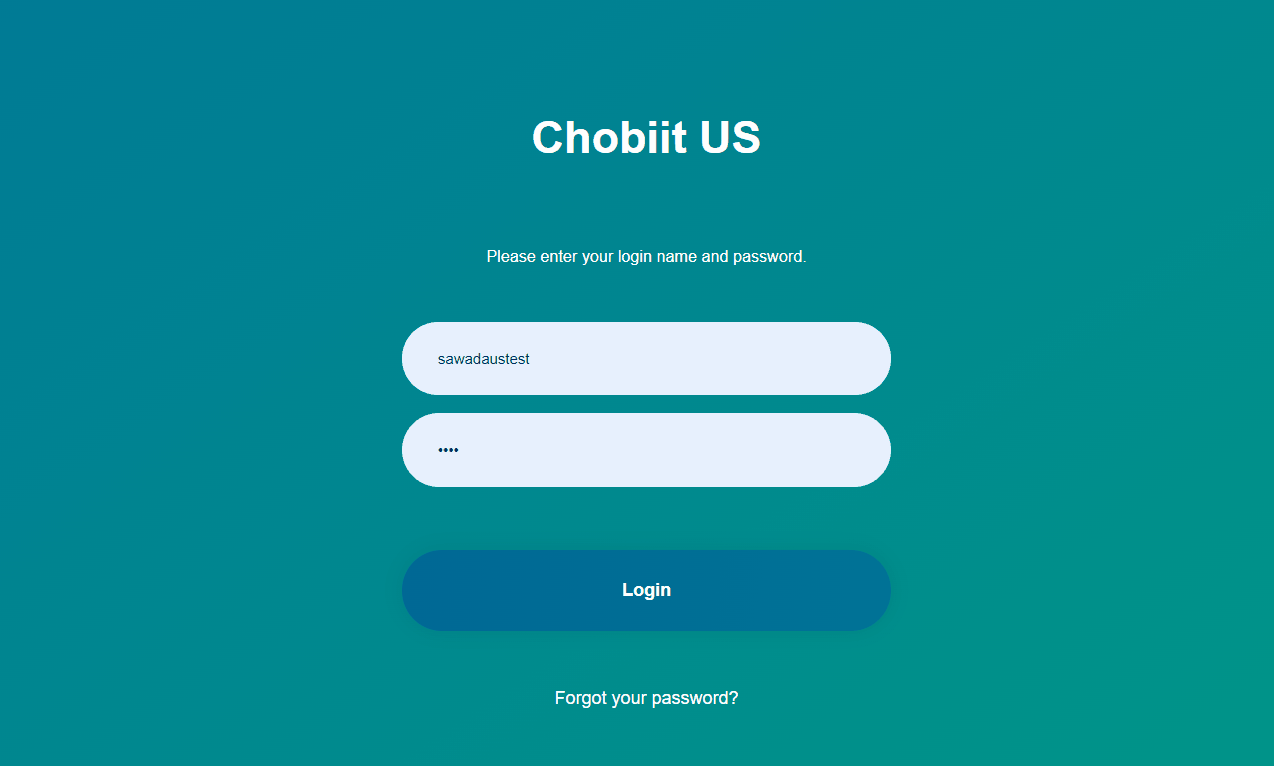
When a Chobiit user logs in, they will see the following screen.
Upon logging in, only apps shared with the user will be displayed.
Using a Kintone app as a web form
Create the Kintone app to use as a web form.
Generate an API token in the app. Copy the API token.
Give the API token the following permission: Add records
In the Chobiit plug-in settings of the [Chobiit] Setting app, navigate to the “App Settings” tab. Click the “+ New” button to add a new app, and select the created web form app from the search field.
Authentication
Select “Public” as the authentication type.
API token
A settings section called “Public settings” will appear. Paste the copied API token from the web form app in the “API token of this app” field.

Feature settings
This setting allows a public user to view and/or add records in this app.
When using an app as a web form, enable the “Add records” setting only.
When toggled on, the URL and iframe tags of the web form are generated and displayed.
Enable bot check
A setting under the “Display settings” section, the “Enable bot check” setting adds an extra step when submitting a form to check whether the submitter is a real human or a bot.
Enable field display conditions
A setting under the “Display settings” section, the “Enable field display conditions” setting allows any field to be set as hidden or uneditable. A hidden field is not shown to the user filling in the web form. An uneditable field prevents the user from making any changes to a field.
If the field display condition is off, you can “view” and “add” all fields.

Page display settings after saving a record
Navigate to the “Other settings” tab. Toggle the “Page display settings after saving a record” and use the rich text editor to set a message of choice to be displayed after a user submits a record.
Save the Chobiit settings and update the app.
Now records can be added to a Kintone app by submitting the form located at the generated URL.
Other Features
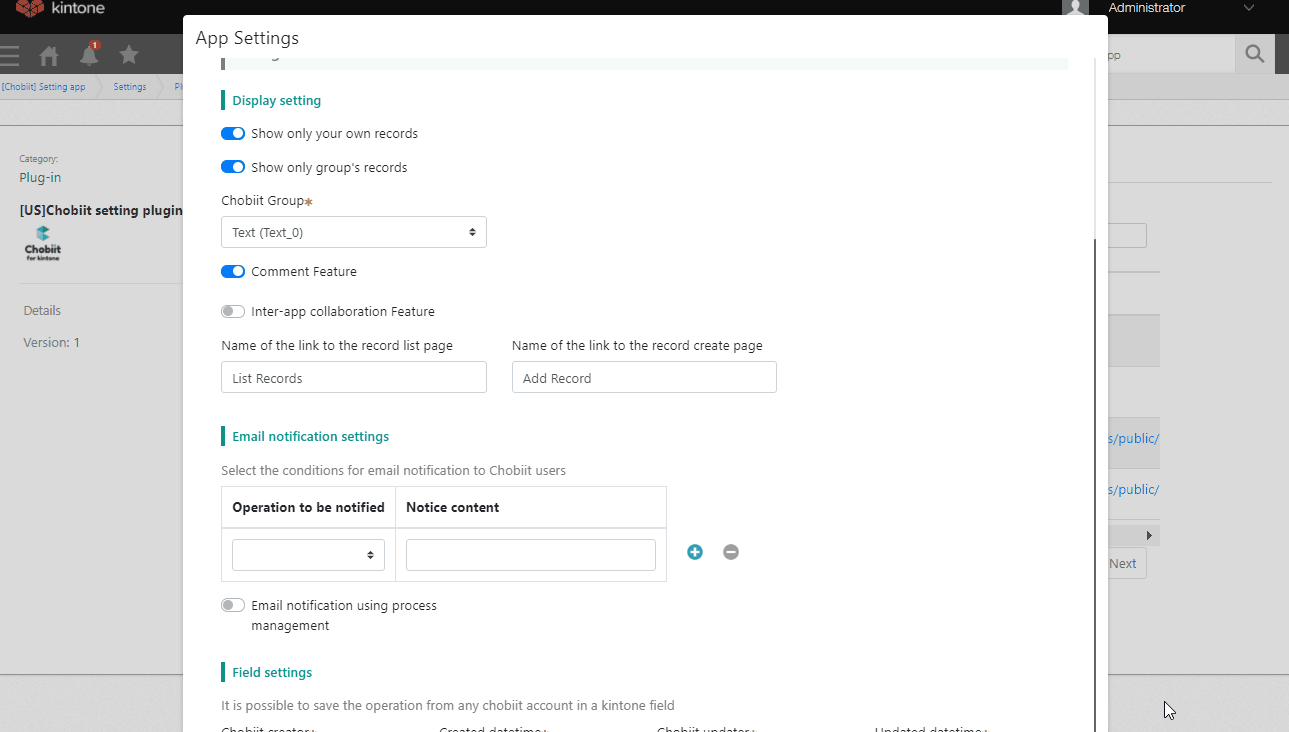
Show only user’s own records (with login authentication only)
This feature is found in the App Settings of a linked app that uses login authentication, under “Display settings”. When enabled, logged in Chobiit users will only be able to view records that they created.
Show only user’s group’s records (with login authentication only)
When enabled, logged in users will only be able to view records created by groups the user belongs to.
* The “Show only user’s own records” setting can be used at the same time as the “Show only user’s group’s records” setting.
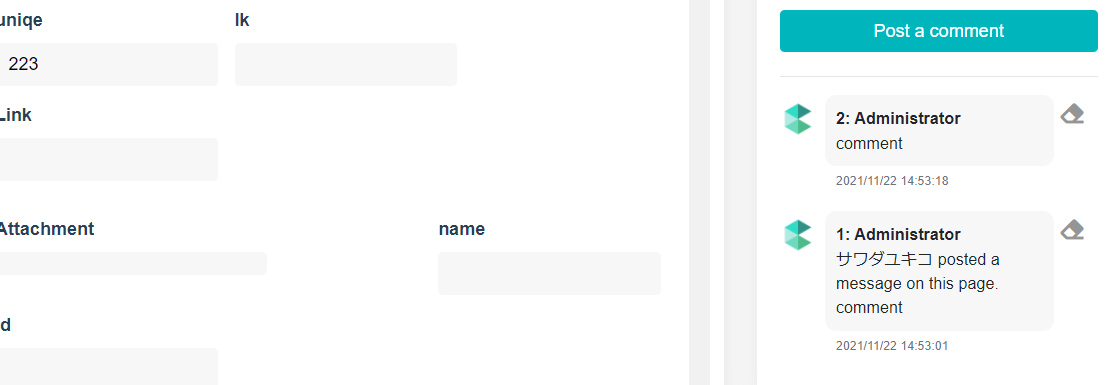
Enable comments (with login authentication only)
Like Kintone, comments can be posted in Chobiit. Comments posted between Chobiit and Kintone can be seen and replied to from either service.
Enable app redirect after saving new record
After saving a new record in an app with Chobiit, this feature can be used to redirect the user to the Add Record page of another app. In the settings, select the app that should be redirected to from the “Connected Apps” setting. Only apps that have been added to Chobiit will appear as an option. Note that the Chobiit user must have access to both apps through Chobiit in order to use this feature.
Name of the link to the record list page and record create page
The text that appears on the buttons to the record list page and the record create page can be changed with this setting. The defaults are “List Records” and “Add Record”.
Email notification settings (with login authentication only)
This feature allows Chobiit users to receive email notifications when a user in Kintone edits or comments on a record the Chobiit user created.
* Comment notifications will be sent only for comments from accounts registered in the “Kintone Account Settings” tab of the Chobiit plug-in settings. Make sure to register any Kintone accounts that will post comments.
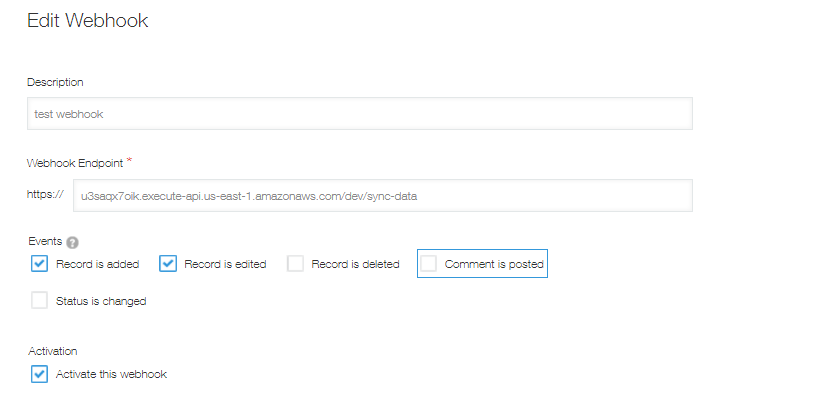
A webhook must be set up for the app that will user email notifications.
[Webhook settings are required for notifications]
webhookURL:u3saqx7oik.execute-api.us-east-1.amazonaws.com/dev/mail-notice
Required events: Record is added, Record is edited, Comment is posted, Status is changed
Make sure that “Activate this webhook” is checked. Save the webhook settings and update the app.
Lookup settings (with public apps only)
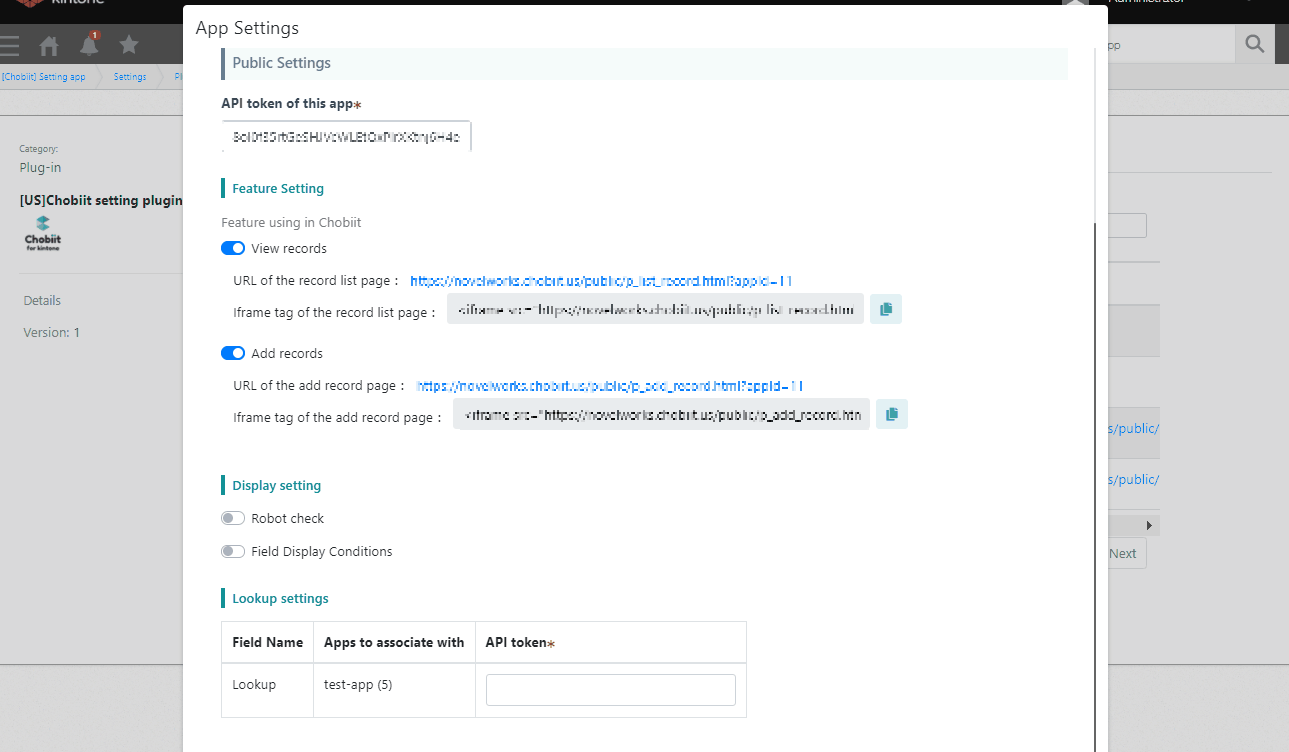
If there is a lookup field in the app, the field will be displayed in the settings.
Generate an API token for the lookup data source app and enter it here.
Give the API token the following permission: View records
Chobiit display settings
Save button text
The text that appears on the save button can be changed here.
Use specific list view to filter records
A list view created in Kintone can be selected to be the list of records displayed in Chobiit. Note that only one list can be set in Chobiit.
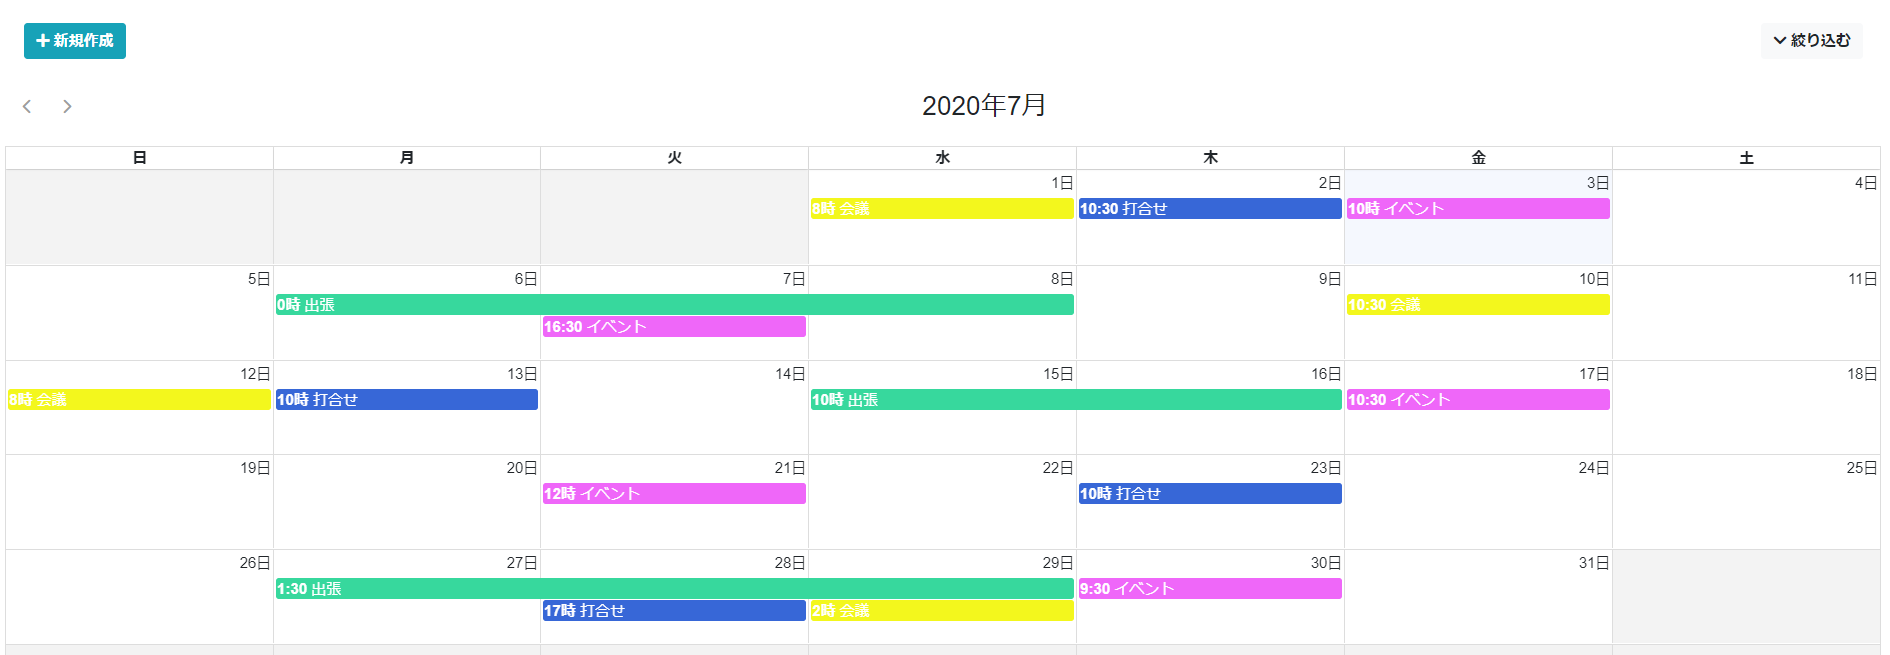
Calendar View
The record list can be displayed as a calendar.
Theme color selection
A unique color theme can be set for each app within Chobiit.

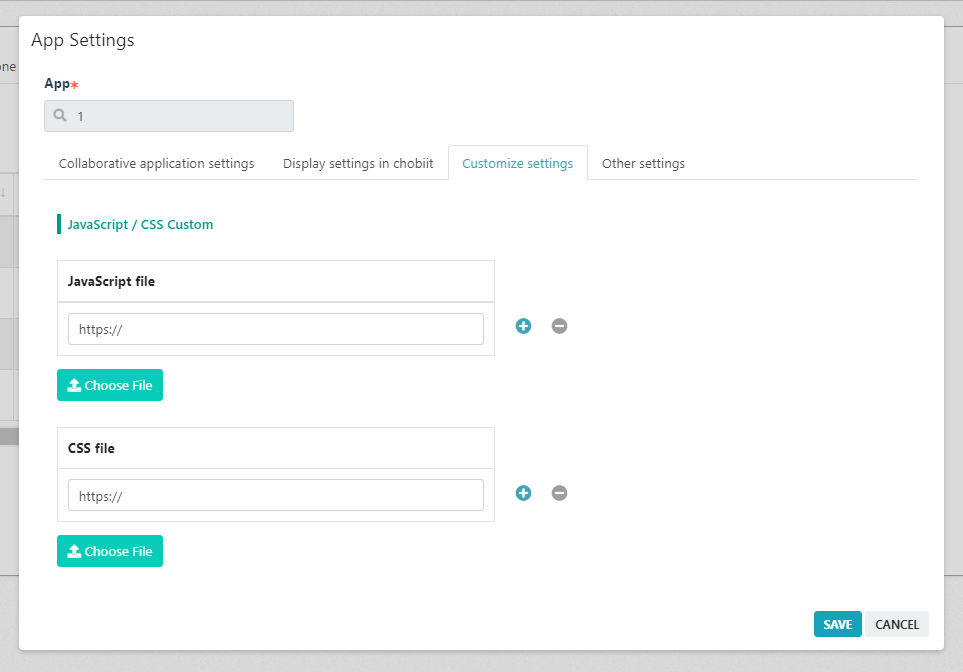
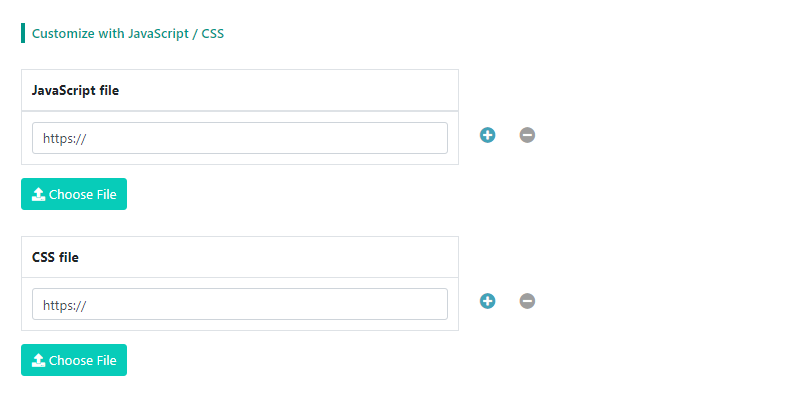
Customization settings
Customization with JavaScript/CSS (Beta version)
The appearance of the app in Chobiit can be customized through DOM manipulation. Note that only the appearance of the app may be customized and there is currently no provided API.
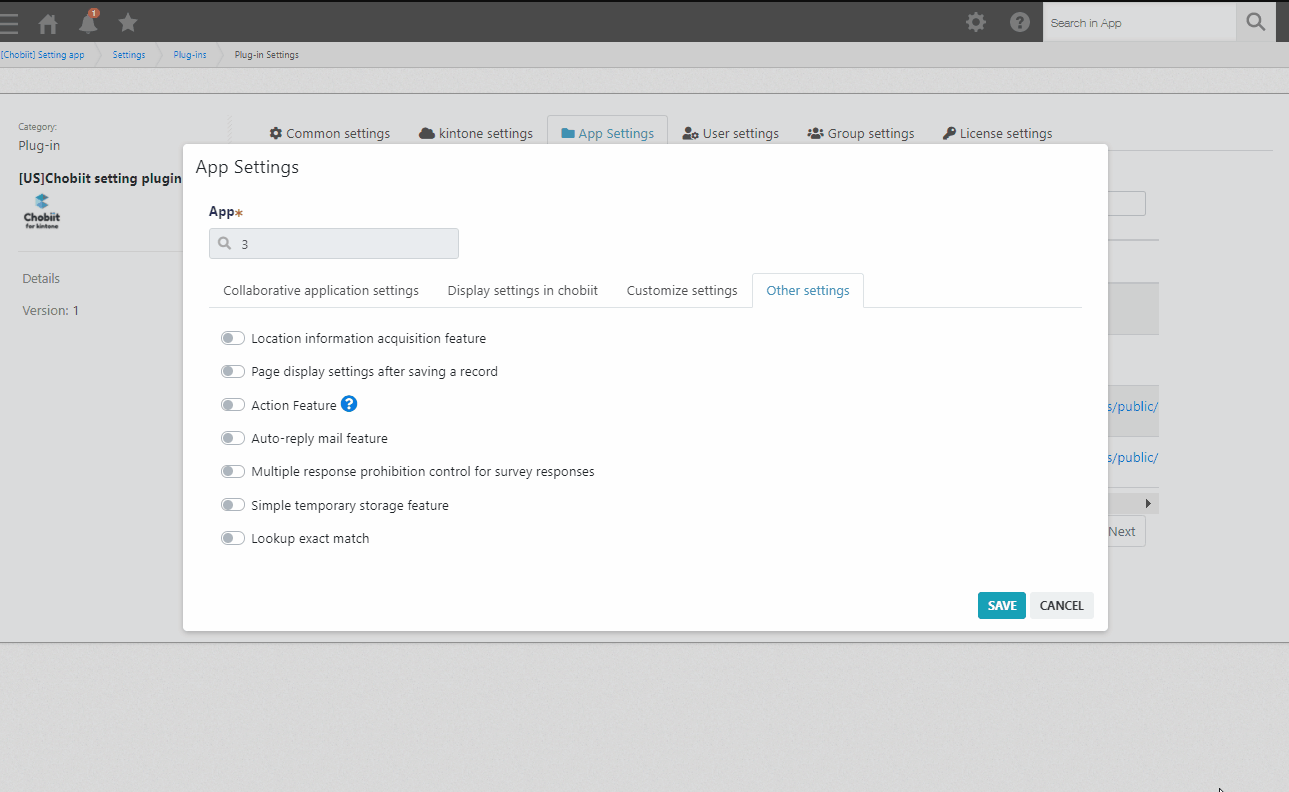
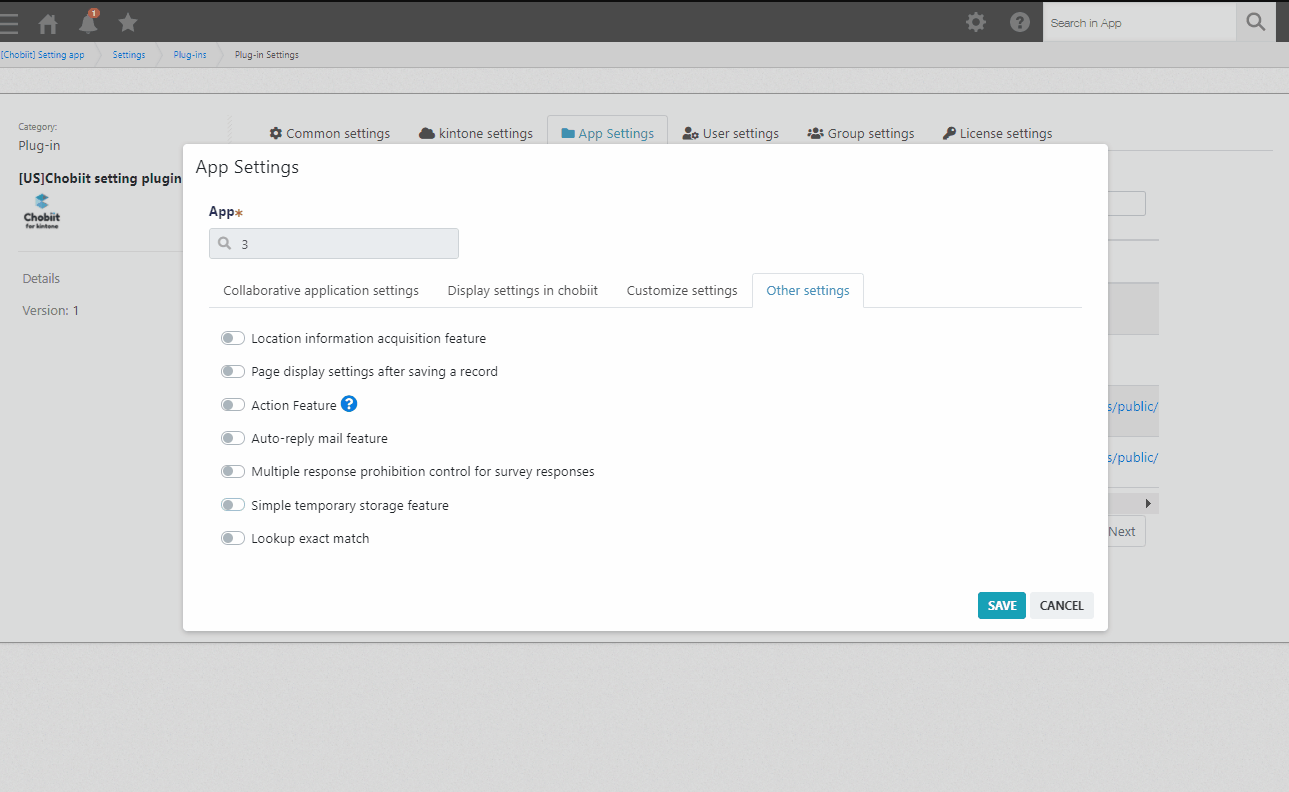
Other settings

Enable retrieval of location data
When this feature is enabled, the latitude and longitude of the location that a record is registered through Chobiit, will be retrieved and added to the record.
Before enabling this feature, the fields to hold the latitude and longitude values must be added to the app.
Supported field types: Text field, Number field
Enable custom page display after record save
The page to be displayed after saving a record from Chobiit can be set. This setting is required only for public apps. It is optional for apps using login authentication.
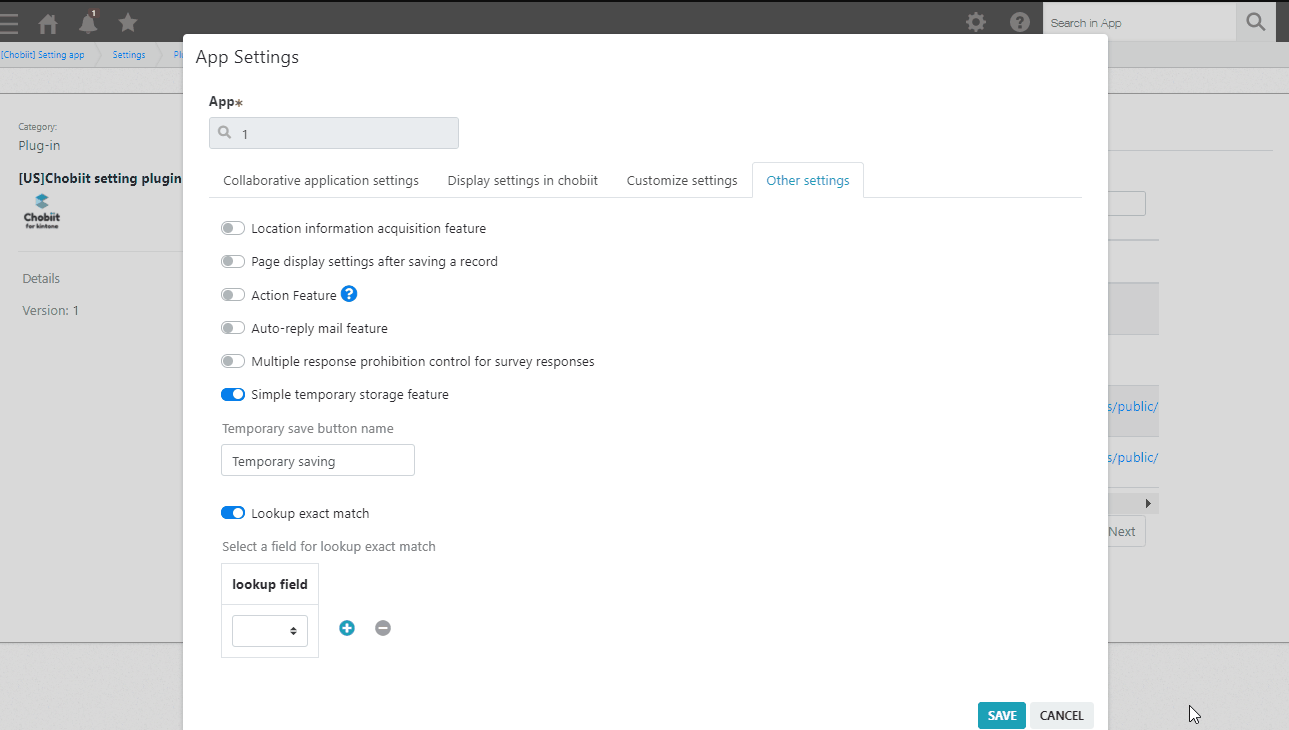
Action feature
Like Kintone, the Action feature can be set up.
* The destination app for an action must also be set up in Chobiit.
Enter the text to appear on the button to perform the action.
Destination app
Select the destination of record to be saved with the action.
Copy source field
Select the source field whose value should be copied.
Copy destination field
Select the destination field that should receive the copied value.
Field not editable
If checked, the destination field will not be editable after the copied value is received.
Update between webhook version apps
This setting allows the automatic updating of a field within the Action source app when a field is updated in the Action destination app.
This feature can be used by enabling the Action feature in the Other settings of an app in the App Settings.
Enabling this feature makes it easy to create online reservation and booking forms.
API token of the app to be linked
Generate an API token for the Action source app and enter it into the setting field.
Give the API token the following permissions: View records, Add records, Edit records
Update key of the app to be linked
Select a field from the Action source app to set as the update key.
Update key of the destination app
Select a field from the Action destination app to set as the update key.
* Note that both fields used as the update key must have “Prohibit duplicate values” enabled.
Field of source app to update
Select the field to be updated when the corresponding field of the Action destination app is updated.
Trigger field of destination app
Select the field to be updated.
Note on selecting a Table as the update field
Only fields with matching field codes will be updated.
Example:
■ App A: Table XXX: text1, text2
■ App B: Table YYY: text1, num1
When updating from app A to app B, only the field with the field code of “text1” will be updated.
* The table field codes can be different
* The field configuration of the two tables does not need to match
Webhook URL: u3saqx7oik.execute-api.us-east-1.amazonaws.com/dev/sync-data
Required events: Record is added, Record is edited
Enable auto-send of confirmation email
This feature automatically sends a confirmation email, which is useful when using Chobiit as a web form.
Fields in the app can be used to compose the email.
The email will be sent from “no-reply@chobiit.us”.
It is recommended to notify users in the form to allow emails from this address.
Prohibit multiple submissions from same user

This feature prevents the same person from submitting a form multiple times. This is useful when using Chobiit as a public survey.
* Note that if the user submits a response from a different browser, the submission will still go through. This feature should be used only as a general prevention system.
Prohibit multiple submissions indefinitely
If duplicate form submissions should be prohibited without a deadline, select “indefinite” from the drop-down.
Prohibit multiple submissions for a specific period of time
If duplicate form submissions should only be prohibited for a certain amount of time, select “period specification” from the drop-down. A second setting will appear. Set the number of days that duplicate submissions should be prohibited.
To update the expiration date, re-enter the number of days and save.
Simple temporary storage feature
This is a feature that allows Chobiit users to temporarily save records when registering.
* Note that if saved content is opened in a different browser than the one it was originally saved in, the saved content cannot be retrieved because it is saved in the original browser.
After enabling this feature, a save button will be added to the Add Record page with the text set in the feature settings.
Prohibit lookup partial match
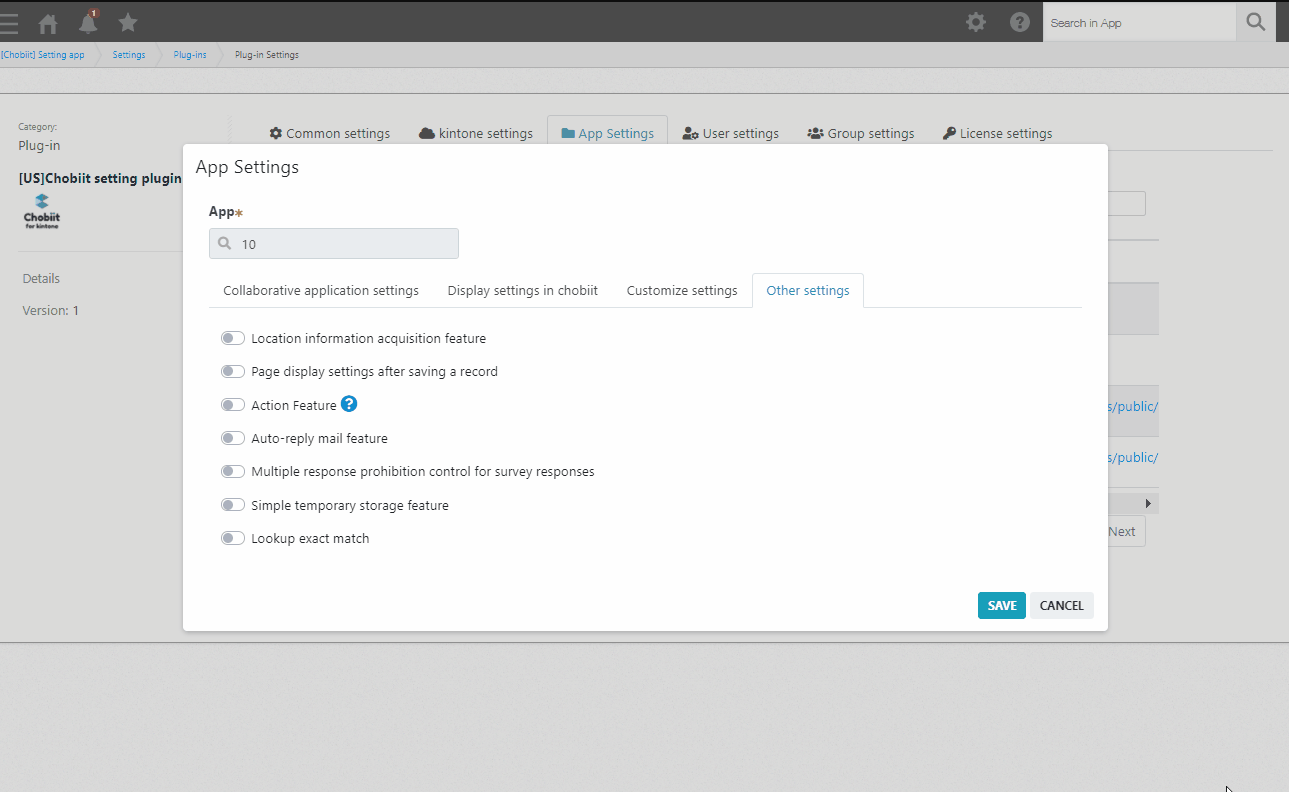
This feature limits the records displayed in lookup fields in the Chobiit app to only those that are exact matches of what is entered in the field.
Group Settings
Chobiit users can be grouped.
* This is a feature related to record access permissions. Note that Chobiit notifications can only be sent to the Chobiit user that created a record.
1. In the “Group Settings” tab of the Chobiit plug-in settings, click the “+ New” button. Enter a name for the group and select the Chobiit users to associate with the group.
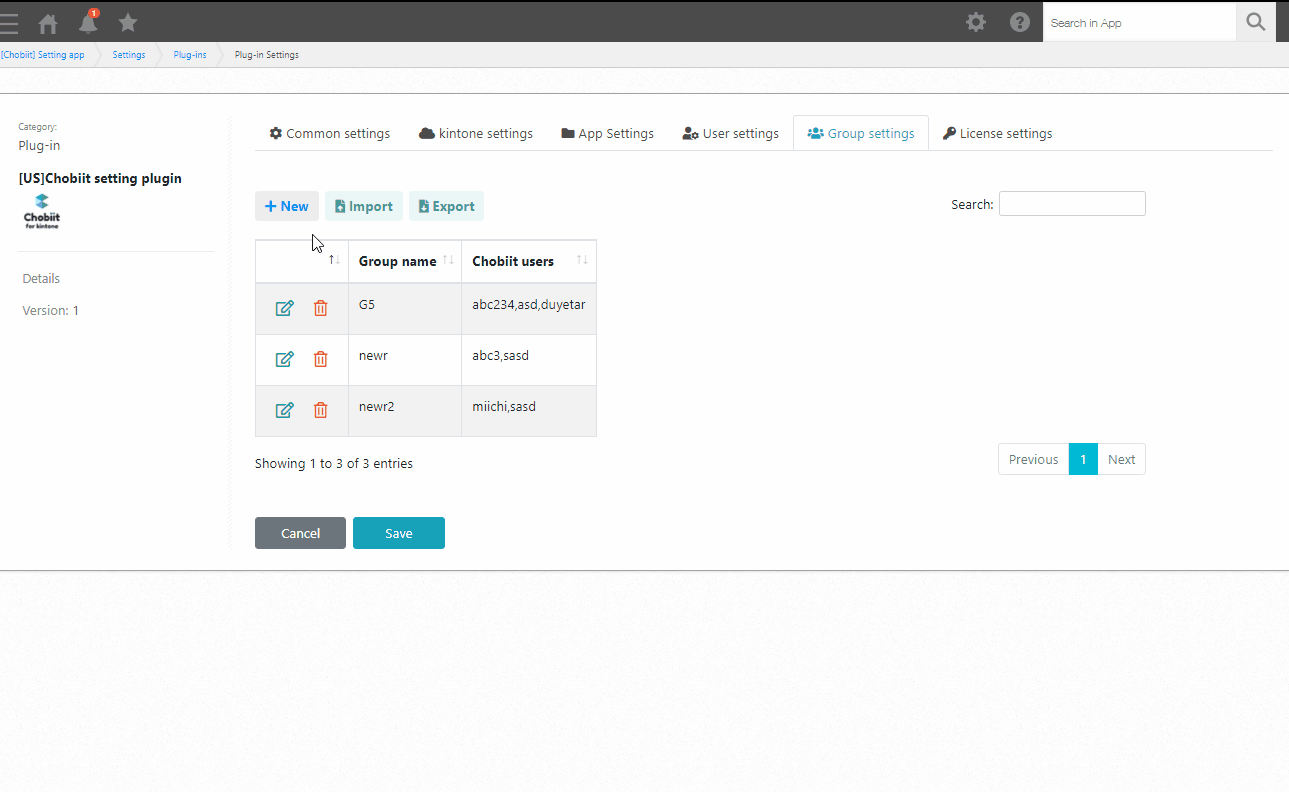
2. In the form settings of the app to use the Group feature with, add a Text Area field to the form to handle the group.
3. In the App Settings of the Chobiit plug-in settings, enable the “Show only user’s group’s records” setting. Select the Text Area field added in the previous step.
4. To specify which records should be displayed to each group, add the group names separated by a comma (,) to the Text Area field.
When adding records from Chobiit, the group name is automatically added to the Text Area field.
Other General Settings
Allow user self-registration
This feature allows users to create their own Chobiit accounts.
1. Enable the “Allow user self-registration” setting.
User Registration URL: https://kintone domain.chobiit.us/register.html
2. Select the app(s) to link. Apps set to “With authentication” or “Both” are displayed in the drop-down.
3. Select the Kintone account(s) to associate with new user accounts. The registered accounts in the “Kintone Account Settings” tab will appear in the drop-down.
Created Chobiit users are linked to Kintone accounts in order of the selected Kintone accounts, starting from the top.
Customize with JavaScript / CSS
The appearance of Chobiit can be customized by manipulating the DOM.
* Note that there is no currently provided API.
Check the browser’s developer tools for the id/class name of each DOM element.
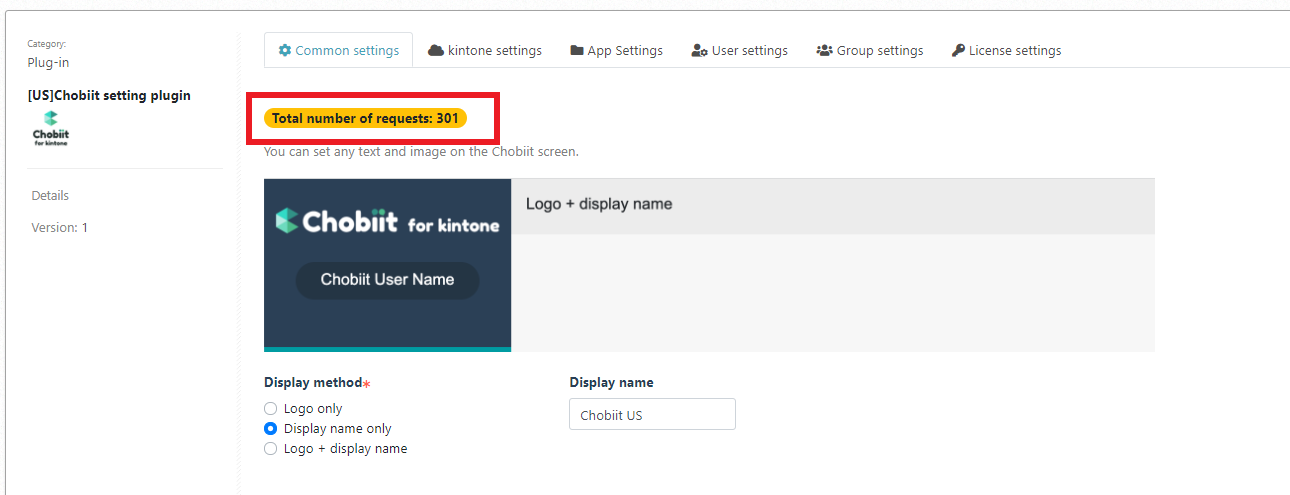
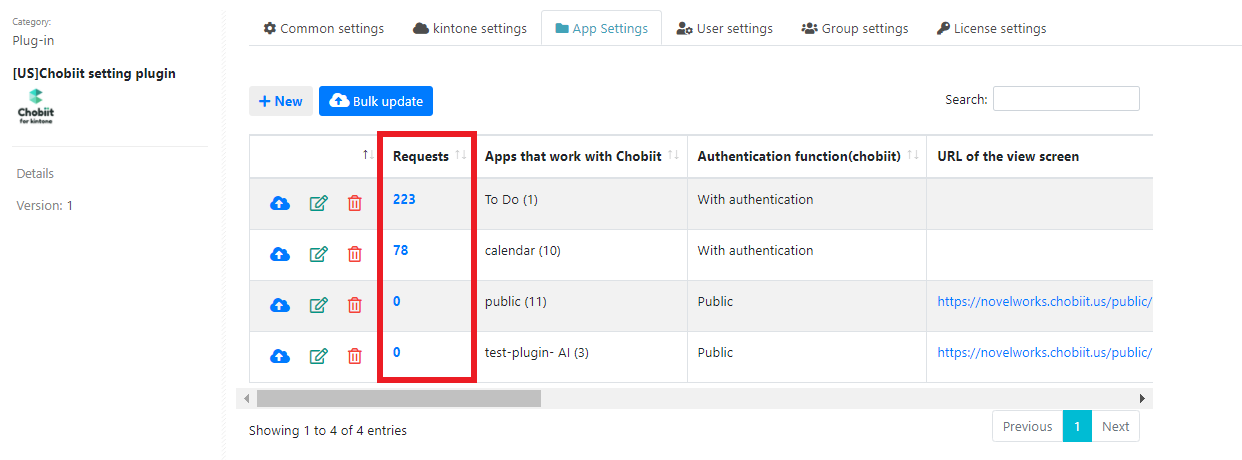
Checking consumed requests
Method 1: Check the number of consumed requests from the plug-in settings.
The total number of consumed requests will appear in the “Total number of requests” display in the General Settings tab.
The number of requests consumed per app will appear in the “Requests” column of the App Settings tab.
The number of requests consumed per user will appear in the “Number of Requests” column of the User Settings tab.
Method 2: Check the number of consumed requests through the records of the [Chobiit] Setting app.
On the 1st of each month, the total number of requests consumed in the previous month will be registered as a record in the [Chobiit] Setting app.
Tracked data points:
– Total number of requests
– number of requests per app
– number of requests per user
* If there are 1000 or more Chobiit accounts, the record/table display may not show or may be delayed.
Importing and Exporting Users
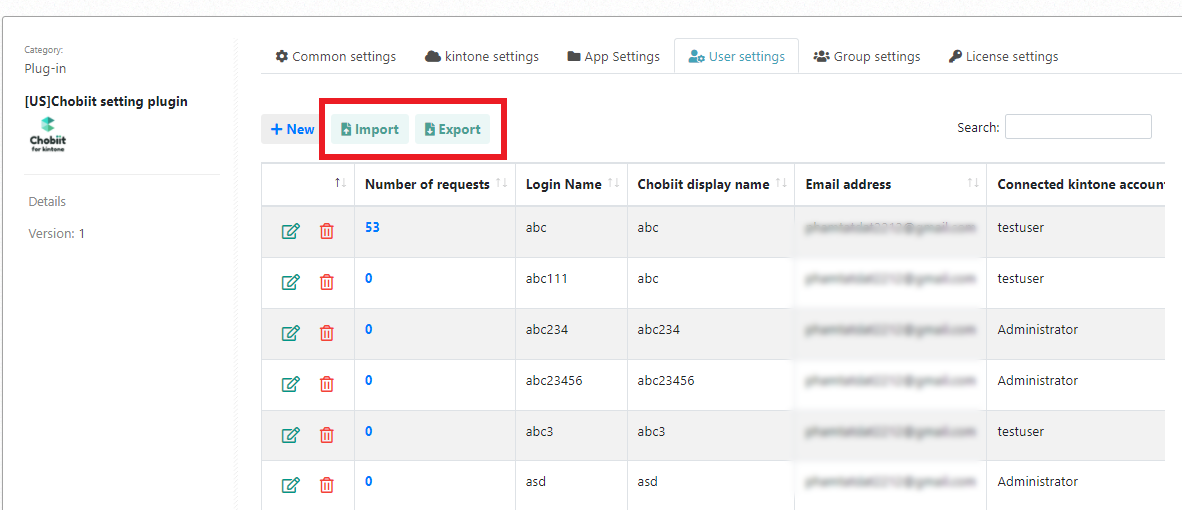
User import
Users can be bulk created by importing a CSV with user information.
Required details for import
| Login Name | Half-width or full-width alphanumeric characters up to 50 characters |
|---|---|
| Associated Kintone account | Login name of the Kintone account to associate with the Chobiit account |
| Chobiit display name | Up to 50 characters |
| Email address | The email address of the Chobiit user |
| Shared app(s) | The app IDs of the apps the Chobiit user can access, separated by a comma (,). This is only necessary if the Login authentication settings are enabled. |
| Administrator | Enter “1” in this field to set the user as an administrator |
| Password | The initial password of the Chobiit user. Must be all half-width alphanumeric characters up to 50 characters. |
After importing, Chobiit users will receive a notification email stating that the setup is complete.
User export
Registered user account data can be exported to a CSV file.
* Note that user passwords cannot be exported.
Activation key
Please enter in the Activation Key field